
Setup
To access the settings menu:
Touch the “Menu” button at the lower left of the display. You will be prompted for a password;enter the password (4 digits) and when completed press “Ok”
The default password is: 1 2 3 4
If the password is correct, you will have access to the Main Menu Settings.
Note
The Menu Password can be modified by the user; access
Menu->Change PasswordThe menu password is a 4-number format pin code.
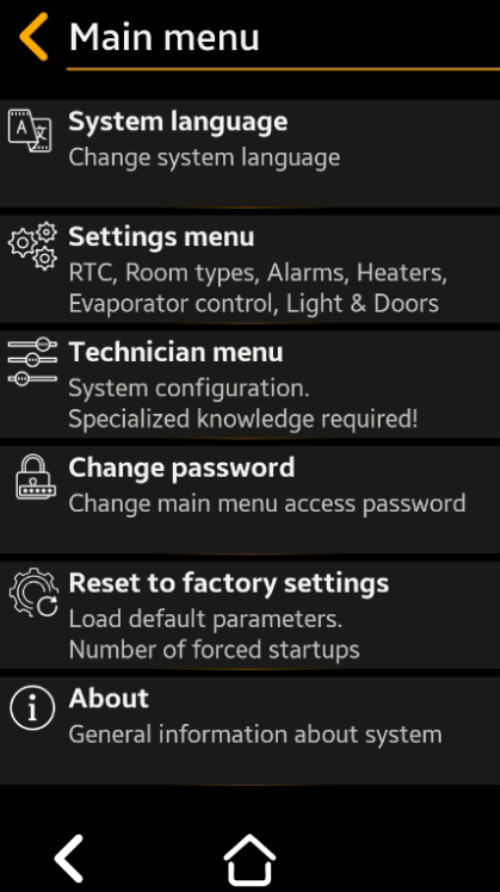
Main menu screen
Categories
- System language – To change system language (Default: English; Available option: Spanish)
- Settings menu – Containing setup of: Real Time Clock , Room Types , Alarms, Heaters, Evaporator, Light and Doors
- Technician menu – Containing setup of: Device measurement unit, Panic switch, Motion detector, Sleep mode, Number of probes, Wi-Fi, Display Brightness, Sanitation, Condenser, Probes Adjust and Logger
- Change password – To change main menu access password
- Reset to factory settings – To load default parameters and counter of number os forced startups
- About – Here you see and edit general information about device like: Device name, Hardware version, Software version, Manufacturing date , Installed room name (x2)
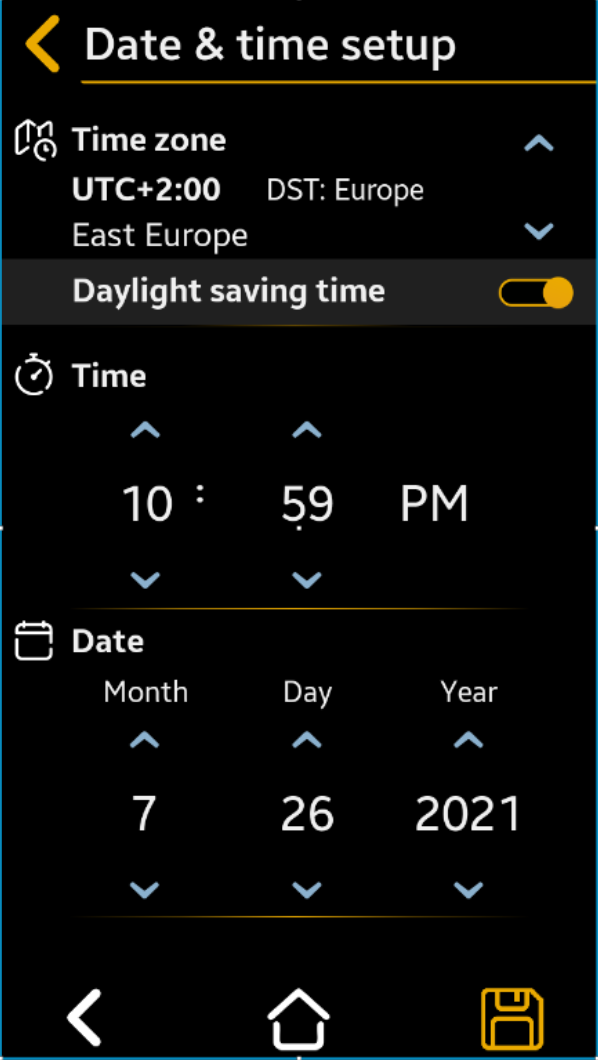
Date and Time
- Hour – advance < > to current, AM or PM
- Minute – advance < > to current
- Month, Day, Year – advance < > to current
- Time Zone – advance < > to current (Default = UTC – 4:00 Atlantic Time)
- Daylight Savings Time – < > to “Yes” or “No” (Default = Yes)
Note
If the system is connected to the Internet, the RTC will be synchronized automatically.
Important
Manually set up the Time Zone and Daylight Saving Time according to your local requirements.
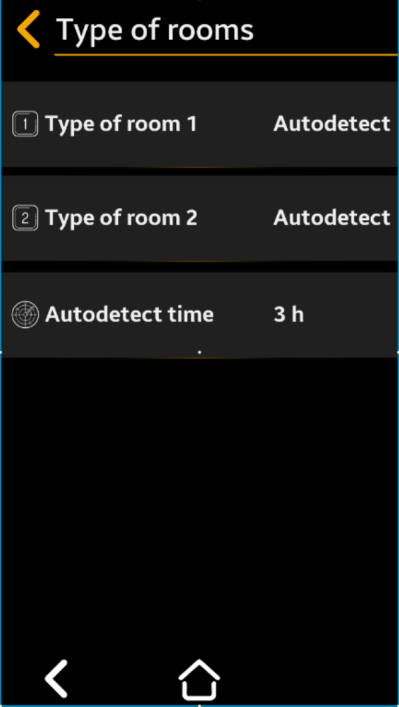
Rooms Types Setup Menu
Used to set the room type (cooler or freezer). The functional parameters, alarms and warnings will be set automatically according to the selected type.
During installation, you can choose theautodetect function. In the user selectable autodetect time, the system will automatically detect the installed room type and set parameters accordingly.Room #1 Type Setup
Select to “Cooler”, “Freezer”, or “Auto”*
(Default = Cooler)
Note
Auto setting will automatically detect room type after “Autodetect time”
Press “ Save” to save, then “
 Back” “Back” to cancel the selection
Room #2 Type Setup (only available if 2 sensors are set in Technician Menu)
Repeat the procedure as for Room #1 Type
Autodetect Time Setup
Select to set 1 to 12 hours for SMRT-100 to automatically detect room type accordingly (Default = 1 hour)
Press “ Save” to save, then “ Back” “Back” to cancel the selection
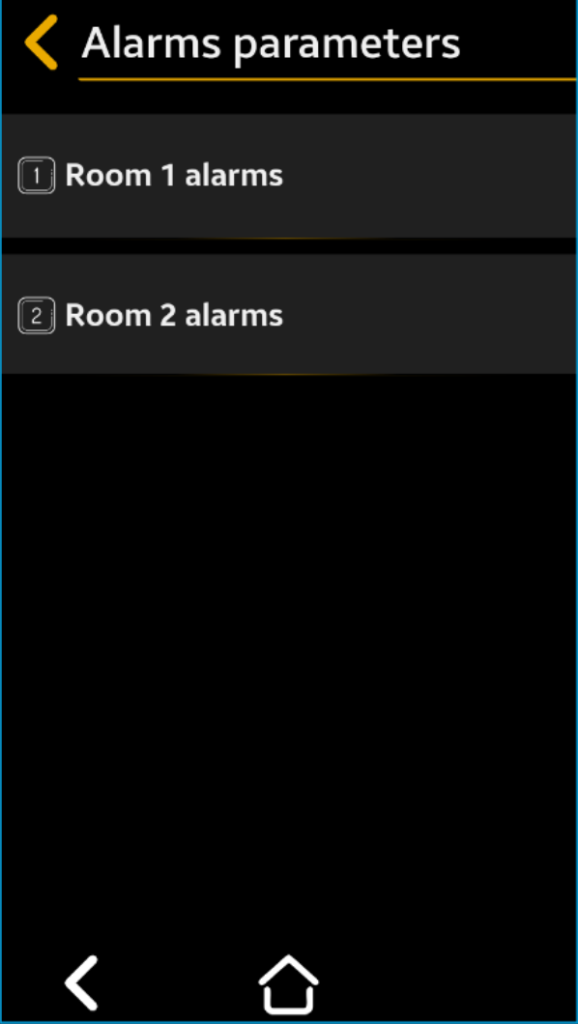
Room #1/Room #2 Alarms parameters
First select the room to set the functional parameters for.
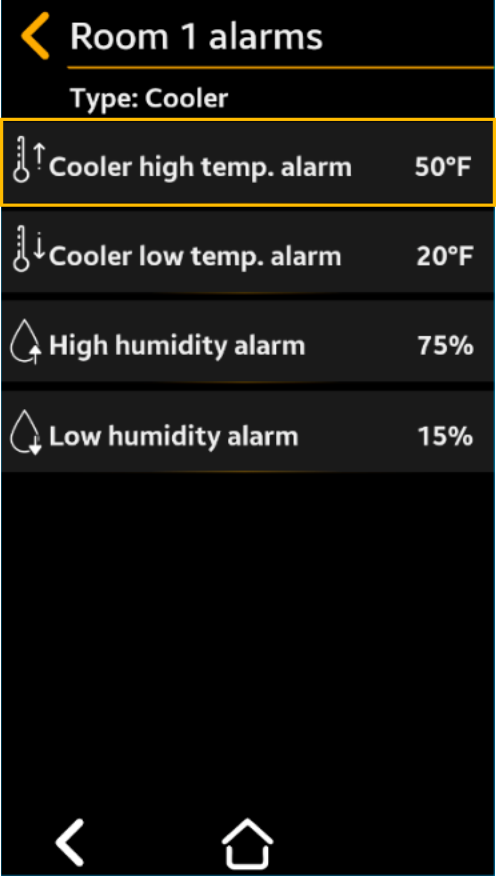
Temperature High Alarm
Advance select to desired alarm temperature
Cooler default = 45°F
Freezer default = 20°F
Room type is indicated at the top of the menu
This is an example of how values are being modified inside menu sections 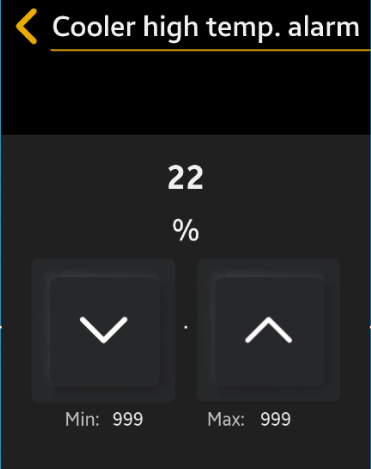
Value: 45°C – is the value you want to set your parameter
Value: 50 (upper) & -20 (lower) – represents the interval of the minimum and maximum values.
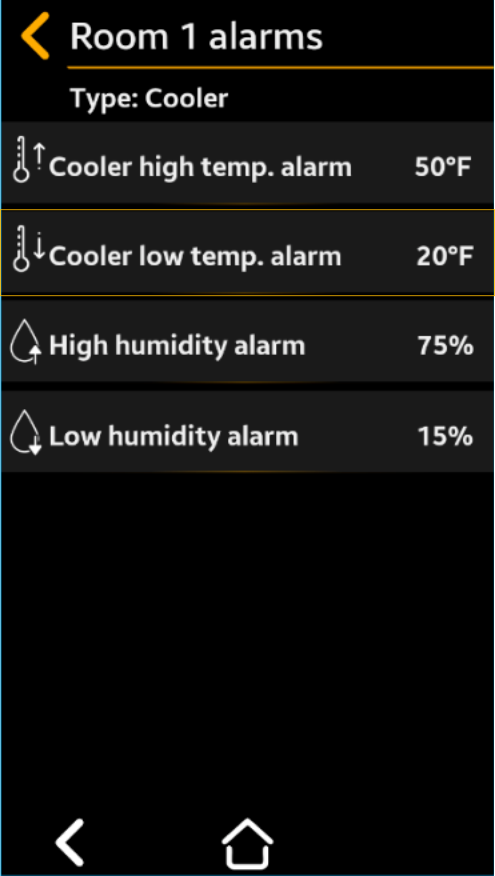
Temperature Low Alarm
Select to desired temperature
Cooler default = 33°F
Freezer default = -25°F
Room type is indicated at the top of the menu
Press “ Save” to save, then “ Back” “Back” to cancel the selection
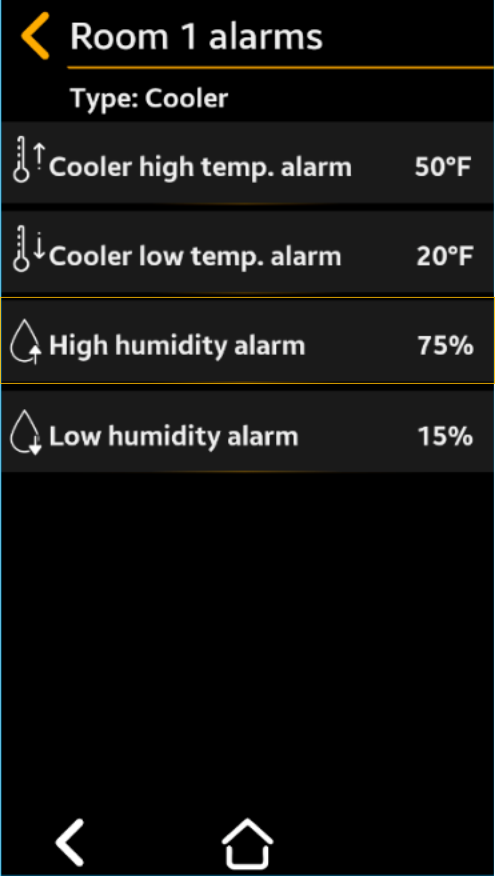
Humidity High Alarm
Select to desired humidity
Cooler default = 80°F
Freezer default = 75°F
Room type is indicated at the top of the menu
Press “ Save” to save, then “ Back” “Back” to cancel the selection
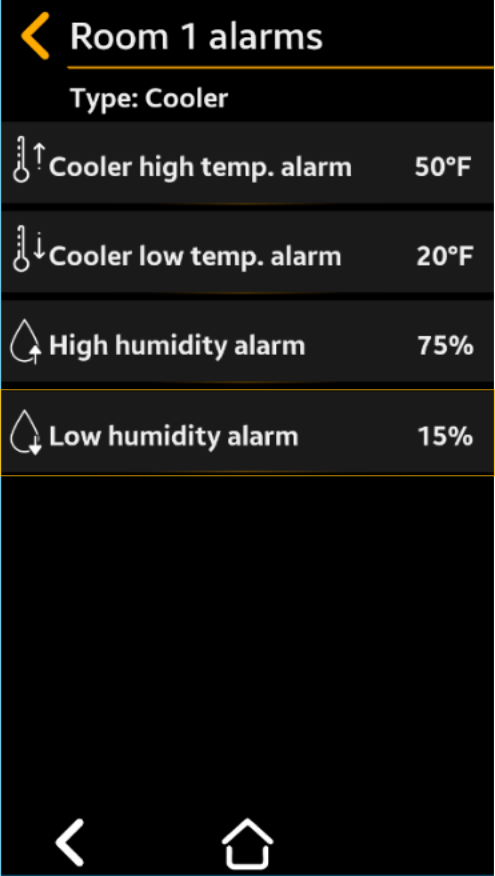
Humidity Low Alarm
Select to desired humidity
Cooler default = 30°F
Freezer default = 35°F
Room type is indicated at the top of the menu.
Press “ Save” to save, then “ Back” “Back” to cancel the selection
Room #2 Alarms only available if 2 sensors are set in the Technician Menu– Repeat the procedure as for Room #1 Type

Heaters Setup
Used to set the door heaters and window heater control parameters according to the programmed room type (cooler or freezer). The door heaters are on/off according to a PDM cycle with an 8-minute period; the on-time is set by the Percentage parameter in Menu Settings (see 3.1.4 for details).
For example, if the Start Air temperature is set to 35°F and the Percentage is set to 60%, it means that as long as the air temperature inside room 1 goes under 35°F, the door heater will be on for 4.8 min. (60/100 x 8min and off for 3.2min.).
Door #1 Heater
Enabled– Select to Yes or No
Default = Yes
Percentage– Select to the desired % from 0% to 100% of the time from an 8 min period the heater is on.
Default = 50%
Start Air Temperature– Select to the desired temperature from -20 to +50°F below which the heater operates
Default = 45°F
Press “ Save” to save, then “ Back” “Back” to cancel the selection
Door #2 Heater
Only available if 2 sensors are set in the Technician Menu
Repeat the procedure as for Room #1 Type
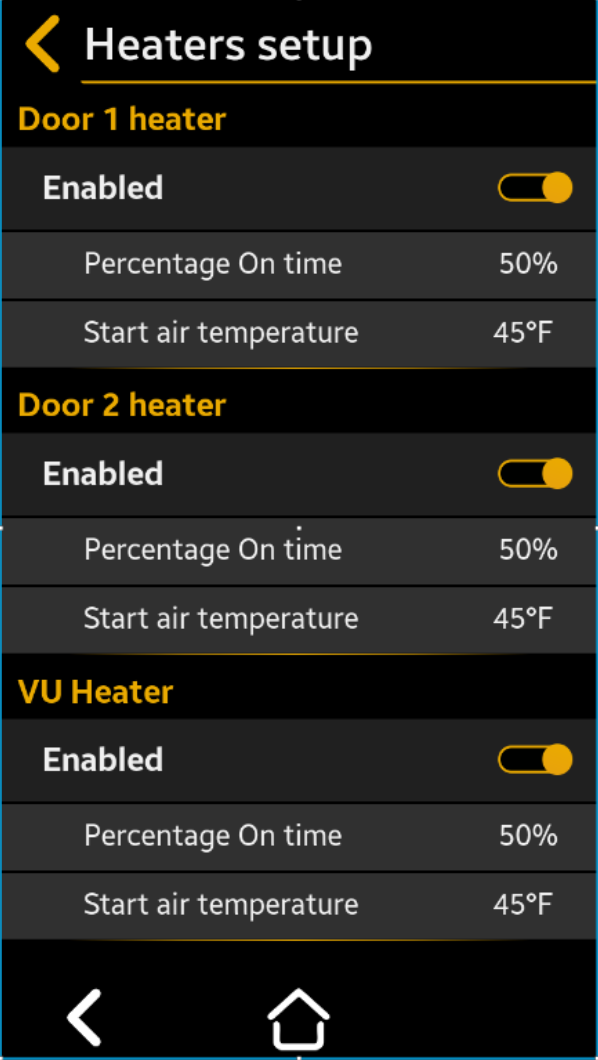
VU Heater
 = Enabled (Default)
 = Disabled
Percentage– Select to the desired % from 0% to 100% of time from an 8 min period the heater is on.
Default = 75%
Start Air Temperature– Select to desired temperature from -20 to +50°F below which the heater operates
Default = 45°F
Press “ Save” to save, then “ Back” “Back” to cancel the selection
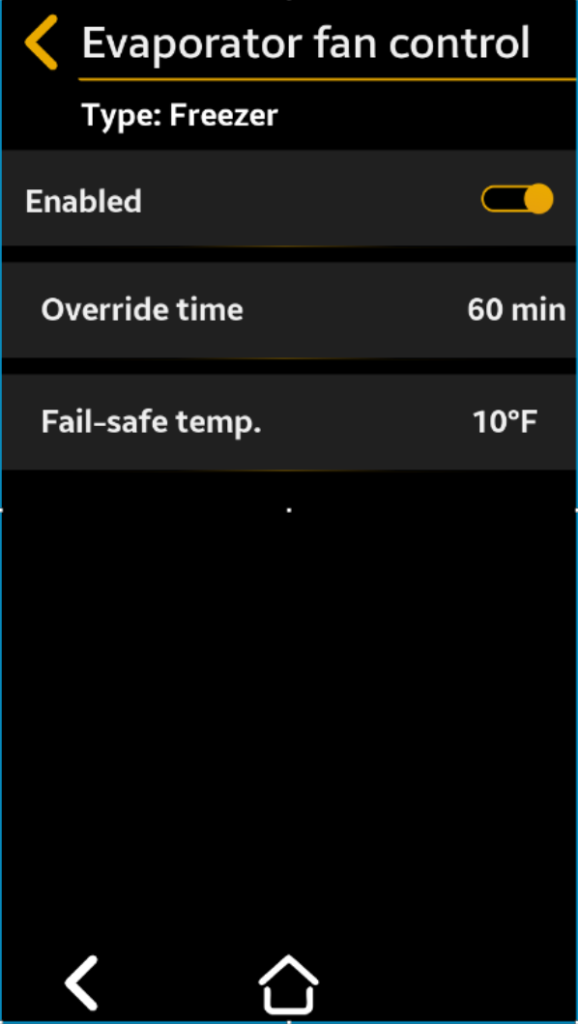
Evaporator Fan Switch Setup
Used to set the parameters to control the evaporator fans upon entry into the cold room. To avoid displacing cold air with warm air when users are opening the door, press Evap. Fan Switch and the evaporator fans will stop blowing. The fan will restart according to user-selectable time and temperature conditions.
= Enabled (Default)
= Disabled
Override time– Select to minutes between 1 to 60 min. of fan “Off” duration, after which the fan automatically turns back “On”
Default = 5min
Temp fail-safe– Select to the desired temperature between 35 and 90°F at which the fan automatically turns back “ON”
Default = 45°F
Press “ Save” to save, then “ Back” “Back” to cancel the selection
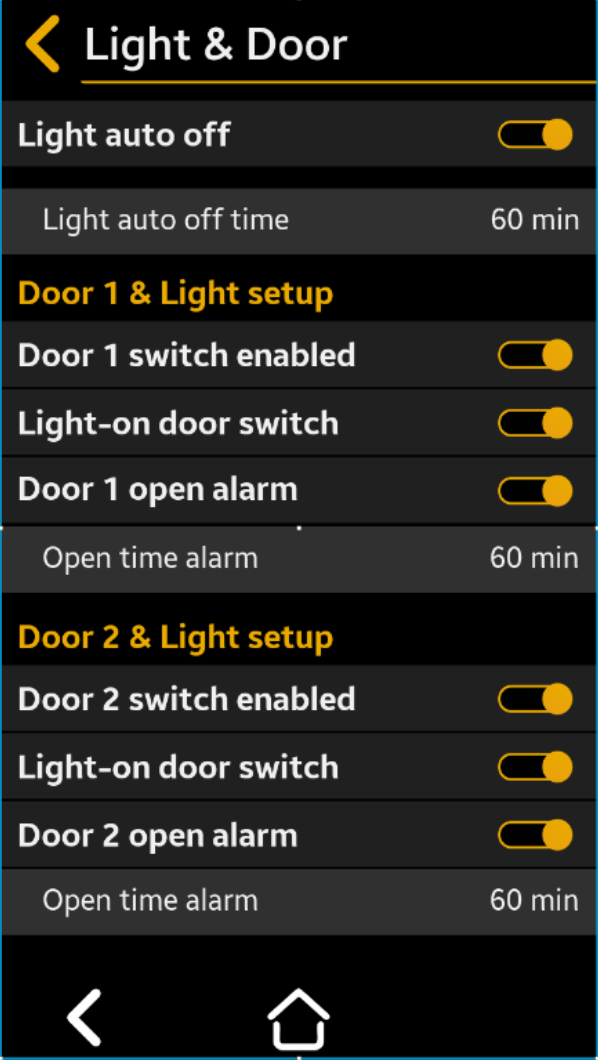
Light & Door Setup
Use to set the room’s lights control. Room lights are controlled by the TFT light button and can be automatically turned on or off by other user selectable settings.
The door opening can turn on the light if to the door switch is enabled. The motion detector can turn the light on if enabled and motion is detected in the room.
The light will be automatically turned off after a user selectable time.
Light Auto Off Enabled
= On
= Off (Default)
If enabled, the light will automatically turn off after the user selectable time expires.
Light Auto Off Time– Select to desired minutes between 1 and 60 min. after which the light automatically turns “OFF”
Default = 30 min
Press “ Save” to save, then “ Back” “Back” to cancel the selection
Door 1 Switch Enabled
= Enabled (Default)
= Disabled
Enabled means that the door switch is installed and active.
Door 1 Open Alarm
= Enabled (Default)
= Disabled
When enabled, an alarm is generated if the door is left open for a period of time exceeding the user selected “Open Alarm Time.”
Light On Door Switch
= Enabled (Default)
= Disabled
When enabled, the light will automatically turn on when the door is opened
Open Alarm Time
Select to desired minutes between 1 and 60 min. of delay before Door Open Alarm activates
Door 2 Switch Enabled – Repeat the procedure as for Door #1
Press “ Save” to save, then “ Back” “Back” to cancel the selection